Need some Halloween cooking ideas? We've got a starter, main and dessert option, all gluten-free, dairy-free and vegan... but still full of spooky goodness!
In case you hadn't heard, we are big hummus fans in our house and we have our own tasty hummus recipe posted in a video on our Instagram. However, just to throw in a little Halloween twist, check out this tasty black bean hummus, complete with a soy yoghurt spider web (get out that creative side😉).
Spooky Black Bean Hummus
Ingredients
- 2 cloves garlic
- 2 15-ounce cans black beans drained and rinsed
- 2 tablespoons tahini
- 3 to 4 tablespoons lime or lemon juice
- 1 teaspoon cumin
- 1/8 to 1/4 teaspoon paprika -- to taste
- 3 tablespoons unsweetened soy yogurt optional
- 1/2 teaspoon salt or to taste
- For Design: additional plain soy yogurt

Instructions
-
With food processor running, drop in the garlic cloves and process until finely chopped. Add the black beans, and process until pureed. Add the remaining ingredients (use the lesser amounts) and process until smooth. Taste and correct seasonings, adding more as needed.
-
Spoon the hummus into a serving dish, smoothing the top. Using a pastry bag and either soy yogurt or thinned tahini, pipe on the design. Place a plastic spider into the web, or make one yourself from black olives. Refrigerate until ready to serve.
Credit- 'Fat Free Vegan Kitchen'
Stuffed Mushroom Eyeball
So we know we always go for quick and easy recipes, and by those standards these next two recipes could be considered marginally more complicated (i.e. 6 steps not 2) but they just looked so cool and delicious, how could we not share?
Ingredients
- 510 g cremini mushrooms
- 14-ounce (397 g) package extra-firm tofu, drained but not pressed
- 1 clove garlic
- 2 teaspoons lemon juice
- 1 teaspoon salt
- 1 teaspoon Italian seasoning
- 1 teaspoon onion powder
- 1/4 teaspoon black pepper
- 2 1/2 tablespoons (37 ml) balsamic vinegar
- 2 tablespoons (10 g) julienne-cut sun-dried tomatoes, dry not in oil
- 2.5-ounce (71 g) can of sliced black olives

Instructions
- Rinse or brush off the mushroom caps and pull all of the stems out of them. Set aside on a baking sheet.
- Puree the tofu, garlic, lemon juice, salt, Italian seasoning, onion powder and black pepper together in a food processor until completely smooth. Scoop the mixture into a piping bag or ziploc bag with a circle tip.
- Preheat the oven to 180ºC. Carefully, pour just a couple of drops of balsamic vinegar into each mushroom cap.
- Pipe the tofu ricotta mixture into each cap so that it creates a small mound. It will be a different amount depending on the size of your mushroom caps.
- Finely chiffonade cut the sun-dried tomato pieces and start placing them on stuffed mushrooms. You can make them more vein-like by scrunching them a bit. Top with one slice of olive and press it down gently.
- Bake the mushrooms for 10 to 15 mins. or until the caps begin to wrinkly slightly. You can serve these warm or room temperature.
Credit- 'Vegan Yack Attack'
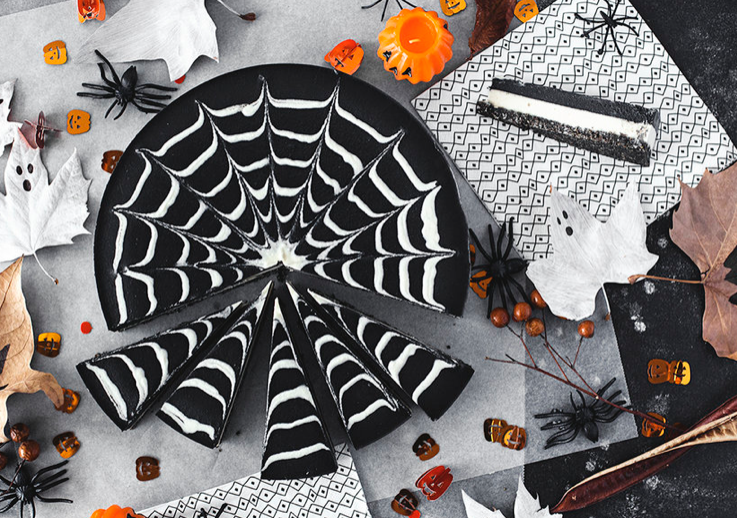
Double Chocolate Halloween Cheesecake
The final showstopper🤤😍...
Ingredients
Base
- 10 medjoul dates
- 1 cup | 100 gr. rolled oats (choose gluten free if intolerant)
- 1/2 cup | 50 gr. nuts (we used cashews)
- 1/2 cup | 50 gr. desiccated coconut
- 1 tbsp food grade activated charcoal powder
- 2 tbsp raw cacao powder
- 2 tbsp rice malt syrup
- Pinch of fine himalayan salt
White Chocolate Layer
1 3/4 cups | 225 gr. raw cashews, soaked overnight (or for a minimum of 4 hours)
1/3 cup | 80 ml. rice malt syrup
2 tbsp coconut oil
1/4 cup | 60 ml. raw cacao butter (melted, but not hot)
2 tbsp lemon juice
1/2 cup | 125 ml. plant-based milk
1 tsp vanilla extract
Chocolate Charcoal Layer
1 3/4 cups | 225 gr. raw cashews, soaked overnight (or for a minimum of 4 hours)
1/3 cup | 80 ml. rice malt syrup
1/4 cup | 60 ml. coconut oil (melted, but not hot)
2 tbsp lemon juice
1/2 cup | 125 ml. plant-based milk
1/4 cup | 20 gr. raw cacao powder
3 tbsp food grade activated charcoal powder
1/8 tsp fine himalayan salt

Instructions
Base
- Add all the ingredients except for the dates to your food processor or high speed blender and process for about 30 seconds or until they turn into a fine meal.
- With the motor running, add the pitted dates one by one until they're perfectly combined and the meal turns sticky.
- Line a cheesecake pan (we used a round 25cm springform pan) with with parchment paper.
- Evenly scatter the mixture into the pan and press it down firmly.
- Set aside.
White Chocolate Layer
- Rinse and drain the soaked cashews.
- Add them to the food processor/blender and process for a couple of minutes, stopping a few times to scrape down the sides of the bowl. Process until the cashews turn into a smooth paste.
- Add the rest of the ingredients (except for the cacao butter) and process for 30 seconds.
- With the motor running on a medium setting, pour in the melted cacao butter.
- Process at the highest speed for a few minutes until you get a rich, creamy mixture. Be patient and blend until the cashew cream is completely silky.
- Reserve 1/4 cup of the mixture in a piping bag or syringe.
- Pour the remaining cream into the pan.
- Gently shake the pan a little to even out the surface and remove any air bubbles that might be trapped in the layer.
- Place the pan in the freezer for 30 minutes, so the layer will settle.
Charcoal Chocolate Layer
- Rinse and drain the soaked cashews.
- Add them to the food processor/blender and process for a couple of minutes, stopping a few times to scrape down the sides of the bowl. Process until the cashews turn into a smooth paste.
- Add the rest of the ingredients (except for the coconut oil) and process for 30 seconds.
- With the motor running on a medium setting, pour in the melted coconut oil.
- Process at the highest speed for a few minutes until you get a rich, creamy mixture. Be patient and blend until the cashew cream is completely silky.
- Remove the pan from the freezer, and pour the charcoal cream into the pan.
- Again, gently shake the pan a little to even out the surface and remove any air bubbles that might be trapped in the layer.
- Starting from the centre, draw a 'bullseye' in the charcoal layer with the white chocolate cream in the piping bag or syringe.
- Insert a skewer in the center of the bullseye and pull it outwards in a straight line. Remove the skewer and wipe it clean with a napkin.
- Repeat until you've drawn a full spider web on the surface of your "cheesecake".
- Place it in the freezer for at least 8 hours so it sets completely.
- Remove from the freezer and allow to thaw for 30 minutes before slicing. Best kept in the freezer for up to 8 weeks but can also be stored in the fridge for up to 3 days.
Credit- 'Cocoon Cooks
Let us know if you give any of these tasty recipes a try! @supernature_snacks